Related Tasks
Adding, Modifying, and Copying Schedules
Adding Recipients to a Schedule
Modifying Recipients in a Schedule
Deleting Recipients in a Schedule
Selecting a User for a Schedule
Defining General Properties for Schedules
Configuring Email Messages for Schedules
Managing Schedules
Access to the Schedules page is determined by the roles assigned to your user profile. Users with access to this page can view and modify all schedules. Schedules can be thought of as timed events, or triggers, that determine when alert, report or file interchange package instructions are evaluated by RL6. Schedules also determine who should be notified, for example, when files are found that meet the alert’s conditions.
Prerequisites: The 'Schedules', 'Create Schedules', 'Edit Schedules', 'Delete Schedules' and 'Make Schedules Active/ inactive' role functions must be enabled.
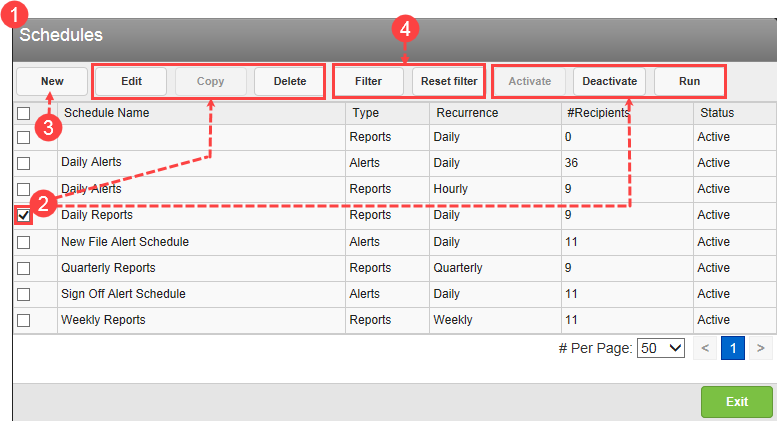
To work with schedules:
- Go to Logged in as > Admin
- Select a schedule to activate the links:
- Edit – opens the Schedule Properties
- Copy – see Adding, Modifying, and Copying Schedules.
- Delete – to remove the selected records from the list. Click Yes to confirm the deletion.
- Note: The Delete, Activate and Deactivate links remain active when multiple records are selected.
- Activate – to start the schedule so that the associated content items are triggered.
- Deactivate – to stop the schedule from triggering its associated content.
- Run – to run the selected schedule on demand
- Edit – opens the Schedule Properties
- Click New to create a new schedule (page 1).
- Use the Filter and Reset Filter links to locate specific records (page 1).